Configuration
After completing Installation, a significant amount of configuration is needed before the Crazyswarm is ready to fly. Follow the steps below.
Set up radio communication
Since the Crazyflies share radios and communication channels, they need to have a unique identifier/address. The convention in the Crazyswarm is to use the following address:
0xE7E7E7E7<X>
where <X> is the number of the Crazyflie in the hexadecimal system. For example cf1 will use address 0xE7E7E7E701 and cf10 uses address 0xE7E7E7E70A.
The easiest way to assign addresses is to use the official Crazyflie Python Client.
Physically label your Crazyflies with numbers.
Assign addresses using the Crazyflie Python Client (use a USB cable for easiest handling).
Each radio can control about 15 Crazyflies. If you have more than 15 CFs you will need to assign different channels to the Crazyflies. For example, if you have 49 Crazyflies you’ll need three unique channels. It is up to you which channels you assign to which CF, but a good way is to use the Crazyflie number modulo the number of channels. For example, cf1 is assigned to channel 80, cf2 is assigned to channel 90, cf3 is assigned to channel 100, cf4 is assigned to channel 80 and so on.
Note: Crazyflies must be rebooted after any change of the channel/address for the changes to take effect.
Finally, add the user permissions to use the USB Radio without being root.
Option 1: follow the official instructions.
Option 2: Use the script:
./pc_permissions.sh
Update firmware
Crazyswarm is tested with the official Bitcraze firmwares for the Crazyflie and Crazyradio.
We supply the binary image of the Crazyradio firmware in the /prebuilt directory.
Upgrade the firmwares of your Crazyflies with the latest official release using cfclient. This will update STM32, NRF51, and attached decks (e.g., LightHouse deck). We tested version 2021.6.
Upgrade the firmware of your Crazyradios with the latest official firmware. Note that this is even required for newly bought Crazyradios.
git clone https://github.com/bitcraze/crazyradio-firmware.gitpython crazyradio-firmware/usbtools/launchBootloader.pysudo python crazyradio-firmware/usbtools/nrfbootload.py flash prebuilt/cradio.binNow unplug and re-plug the radio. You can check the version using
rosrun crazyflie_tools scan -v, which should reportFound Crazyradio with version 99.55.
Adjust configuration files
Several configuration files may require editing. You can edit those files in place, or follow Crazyswarm Integration with Git if you want to use your custom package.
Configure external tracking system
The first configuration file is the ROS launch file, ros_ws/src/crazyswarm/launch/hover_swarm.launch.
It contains settings on which external tracking system to use, among others.
Select hardware make
First, select your tracking system in the appropriate tab below.
Vicon is fully supported and tested with Tracker 3.4. Set the host name of the Vicon machine:
# ros_ws/src/crazyswarm/launch/hover_swarm.launch
motion_capture_type: "vicon"
motion_capture_host_name: "viconPC" # hostname or IP address
If using libobjecttracker as object_tracking_type disable all objects.
OptiTrack is fully supported and tested with Motive 2.3 and Motive 3.0. Select the host name of the Optitrack machine:
# ros_ws/src/crazyswarm/launch/hover_swarm.launch
motion_capture_type: "optitrack"
motion_capture_host_name: "optitrackPC" # hostname or IP address
Use the following settings for correct operation:
Data Streaming Pane:
Up axis: Z
If using libobjecttracker as object_tracking_type disable all assets and make sure that labeled or unlabeled markers are being streamed.
Note
If you have trouble with receiving data, you can try the following.
If your PC has multiple interfaces, set “motion_capture_interface_ip” to the IP of the interface that you want to use.
If you use an older/unsupported Motive version, try setting “optitrack_closed_source” as “motion_capture_type”.
Qualisys has been tested to work with QTM 2.16 both for rigid body and point cloud. It is expected to work with any later version of QTM. Set the host name and port of the Qualisys machine:
# ros_ws/src/crazyswarm/launch/hover_swarm.launch
motion_capture_type: "qualisys"
motion_capture_host_name: "qualisysPC" # hostname or IP address
If using motionCapture as object_tracking_type make sure to check the checkbox Calculate 6DOF in QTM Project options/Processing/Real time actions.
If using libobjecttracker as object_tracking_type and you have setup 6DOF tracking for your Crazyflies in QTM, make sure to disable the Calculate 6DOF checkbox.
The usage of a motion capture system can be disabled by selecting none.
# ros_ws/src/crazyswarm/launch/hover_swarm.launch
motion_capture_type: "none"
This is useful for on-board solutions such as the Ultra-Wideband localization system (UWB), LightHouse, or dead-reckoning using the flow-deck.
In this case, you can visualize the state estimate in rviz if the following settings are enabled.
# ros_ws/src/crazyswarm/launch/hover_swarm.launch
enable_logging: True
enable_logging_pose: True
(This only works for debugging when connected to a few drones.)
Nokov is fully supported and tested with XING 1.0.0.2456. Set the host name of the Nokov machine:
# ros_ws/src/crazyswarm/launch/hover_swarm.launch
motion_capture_type: "nokov"
motion_capture_host_name: "10.1.1.198" # hostname or IP address
Select object tracking mode (motion capture only)
The most significant configuration choice is whether or not to use unique arrangements of motion capture markers for each Crazyflie in your fleet. Select one of the tabs below for a description of each choice. Later steps in the documentation will change depending on your selection.
With a unique marker arrangement for each Crazyflie, you rely on the motion capture vendor to differentiate between objects. This is generally preferred. However, if you have lots of Crazyflies, it can be hard to design enough unique configurations – there are not many places to put a marker on the Crazyflie.
If your arrangements are too similar, motion capture software may not fail gracefully. For example, it may rapidly switch back and forth between recognizing two different objects at a single physical location.
# ros_ws/src/crazyswarm/launch/hover_swarm.launch
object_tracking_type: "motionCapture"
If more than one Crazyflie has the same marker arrangement, standard motion capture software will refuse to track them. Instead, Crazyswarm can use the raw point cloud from the motion capture system and track the CFs frame-by-frame. Here we use Iterative Closest Point (ICP) to greedily match the known marker arrangements to the pointcloud. There are two main consequences of this option:
The initial positions of the Crazyflies must be known, to establish a mapping between radio IDs and physical locations.
The tracking is done frame-by-frame, so if markers are occluded for a significant amount of time, the algorithm may not be able to re-establish the ID-location mapping once they are visible again.
You can use more than one marker arrangement in this mode. For example, you might have several standard Crazyflies with arrangement 1, and several larger quadcopters with arrangement 2.
# ros_ws/src/crazyswarm/launch/hover_swarm.launch
object_tracking_type: "libobjecttracker"
Warning
When using libobjecttracker it is important to disable tracking of Crazyflies in your motion capture system’s control software.
Some motion capture systems remove markers from the point cloud when they are matched to an object.
Since libobjecttracker operates on the raw point cloud, it will not be able to track any Crazyflies that have already been “taken” by the motion capture system.
A special case of duplicated marker arrangements is the case where we only use a single marker per robot. As before, the Crazyswarm will use the raw point cloud from the motion capture system and track the CFs frame-by-frame. In this mode, we use optimal task assignment at every frame, which makes this mode more robust to motion capture outliers compared to the duplicate marker arrangements. The main disadvantage is that the yaw angle cannot be observed without moving in the xy-plane. Nevertheless, it is possible to hover for 30 seconds in place for a Crazyflie 2.1, without causing flight instabilities. The stable hover time for Crazyflie 2.0 is shorter (about 15s), due to the noisier IMU.
Currently, it is not possible to mix duplicate marker arrangements and single marker tracking.
# ros_ws/src/crazyswarm/launch/hover_swarm.launch
object_tracking_type: "libobjecttracker"
Warning
When using libobjecttracker it is important to disable tracking of Crazyflies in your motion capture system’s control software.
Some motion capture systems remove markers from the point cloud when they are matched to an object.
Since libobjecttracker operates on the raw point cloud, it will not be able to track any Crazyflies that have already been “taken” by the motion capture system.
Enumerate Crazyflies
Second we have crazyflies.yaml, a file that lists all active Crazyflies.
The Crazyswarm server reads this configuration file at startup.
If it cannot communicate with all the Crazyflies defined in crazyflies.yaml, it will halt and report an error.
# ros_ws/src/crazyswarm/launch/crazyflies.yaml
crazyflies:
  - id: 1
    channel: 100
    initialPosition: [1.5, 1.5, 0.0]
    type: default
  - id: 2
    channel: 110
    initialPosition: [1.5, 1.0, 0.0]
    type: medium
The file assumes that the address of each CF is set as discussed earlier.
The channel can be freely configured.
The initialPosition field is required for the simulation and for some motion capture configurations, see below.
If you use unique marker arrangements, the initialPosition field of the crazyflies.yaml entries will be ignored,
but it should still be set because the parser will expect it.
If you use duplicated marker arrangements, initialPosition must be correct.
Positions are specified in meters, in the coordinate system of your motion capture device.
It is not required that the CFs start exactly at those positions – a few centimeters variation is fine.
If you use single markers, initialPosition can be a rough estimate.
Positions are specified in meters, in the coordinate system of your motion capture device.
It is often useful to select a subset of all available Crazyflies.
The graphical “Chooser” and the additional configuration file allCrazyflies.yaml help make this easy.
See Manage fleet with the Chooser for details.
Define Crazyflie types
The third configuration file crazyflieTypes.yaml defines the possible types.
Each type specifies the physical attributes of the quadrotor.
The type field in the crazyflies.yaml entries must refer to a type listed in this file.
Note
Many users will not need to modify this file.
# ros_ws/src/crazyswarm/launch/crazyflieTypes.yaml
crazyflieTypes:
  default:
    bigQuad: False
    batteryVoltageWarning: 3.8  # V
    batteryVoltateCritical: 3.7 # V
    markerConfiguration: 0
    dynamicsConfiguration: 0
    firmwareParams:
      ...
  medium:
    bigQuad: True
    batteryVoltageWarning: 7.6  # V
    batteryVoltateCritical: 7.4 # V
    markerConfiguration: 1
    dynamicsConfiguration: 0
    firmwareParams:
      ...
numMarkerConfigurations: 2
markerConfigurations:
  "0":  # for standard Crazyflie
    numPoints: 4
    offset: [0.0, -0.01, -0.04]
    points:
      "0": [0.0177184,0.0139654,0.0557585]
      "1": [-0.0262914,0.0509139,0.0402475]
      "2": [-0.0328889,-0.02757,0.0390601]
      "3": [0.0431307,-0.0331216,0.0388839]
  "1": # medium frame
    numPoints: 4
    offset: [0.0, 0.0, -0.03]
    points:
      "0": [-0.00896228,-0.000716753,0.0716129]
      "1": [-0.0156318,0.0997402,0.0508162]
      "2": [0.0461693,-0.0881012,0.0380672]
      "3": [-0.0789959,-0.0269793,0.0461144]
numDynamicsConfigurations: 1
dynamicsConfigurations:
  "0":
    maxXVelocity: 2.0
    maxYVelocity: 2.0
    maxZVelocity: 3.0
    maxPitchRate: 20.0
    maxRollRate: 20.0
    maxYawRate: 10.0
    maxRoll: 1.4
    maxPitch: 1.4
    maxFitnessScore: 0.001
The dynamics and marker configurations are only relevant when using a motion capture system for tracking, see below for details.
The markerConfiguration fields are not needed with unique marker arrangements.
All marker setup should be done in your motion capture system.
Create one object in your motion capture software for each marker arrangement
and give them names like cf1, cf2, cf3, etc., corresponding to the IDs listed in your crazyflies.yaml.
For duplicated marker arrangements, each arrangement must be described by a markerConfigurations entry.
The points specify the physical arrangement of markers you use, in the motion capture coordinate system.
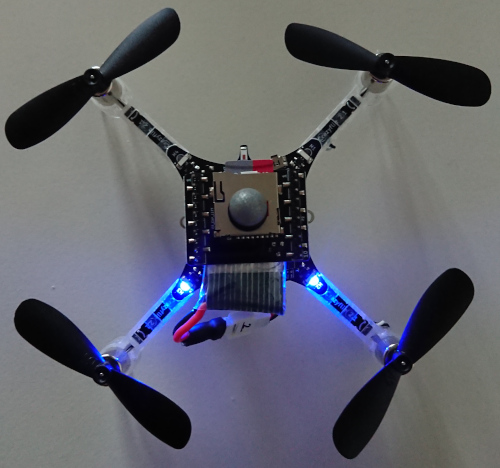
For example, the marker configuration "0" corresponds to an off-the-shelf Crazyflie with the marker configuration shown below:

To get values for the points, follow these steps:
Place one CF with the desired arrangement at the origin of your motion capture space. The front of the Crazyflie should point in the
xdirection of the motion capture coordinate system.Find the coordinates of the used markers, for example by using
roslaunch crazyswarm mocap_helper.launch. (You may need to dosource ros_ws/devel/setup.bashbeforeroslaunch)Update
crazyflieTypes.yaml.
For single markers, the markerConfigurations entry simply contains a single points entry. This point should describe the offset of the marker with respect to the Crazyflie’s center of mass. For example, the marker configuration "3" corresponds to the marker placement shown below:
Manage fleet with the Chooser
The graphical Chooser tool is used to enable/disable subsets of the available Crazyflies
and perform other practical tasks.
Chooser relies on the additional configuration file allCrazyflies.yaml,
which has the same format as crazyflies.yaml (see Enumerate Crazyflies).
Edit this file to contain all the Crazyflies you have available.
Then, start the Chooser:
cd ros_ws/src/crazyswarm/scripts
python chooser.py
You should see something like the screenshot below.
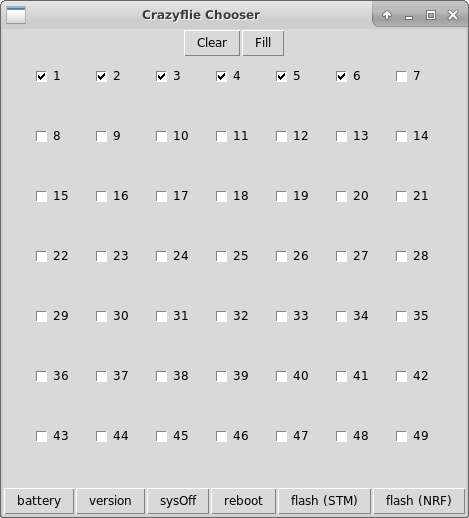
Each checkbox corresponds to an entry in allCrazyflies.yaml.
The checkbox positions should match the initialPosition fields in the file.
You can drag a box to select many checkboxes at once.
Whenever the selection is changed,
the allCrazyflies.yaml entries for the selected boxes are immediately copied and written to crazyflies.yaml.
Note
If you are using the allCrazyflies.yaml and the Chooser,
you should never need to edit crazyflies.yaml manually.
The buttons perform various functions that can be tedious to do for many CFs:
- Clear
Deselects all CFs.
- Fill
Selects all CFs.
- battery
Retrieves battery voltage for enabled CFs. Only works if
crazyflie_serveris not running at the same time. Can be used while the CF is in power-safe mode.- version
Retrieves STM32 firmware version of enabled CFs. Only works if
crazyflie_serveris not running at the same time. Can only be used if CF is fully powered on.- sysOff
Puts enabled CFs in power-safe mode (NRF51 powered, but STM32 turned off). Only works if
crazyflie_serveris not running at the same time.- reboot
Reboot enabled CFs (such that NRF51 and STM32 will be powered). Only works if
crazyflie_serveris not running at the same time.- flash (STM)
Flashes STM32 firmware to enabled CFs. Only works if
crazyflie_serveris not running at the same time. Assumes that firmware is built incrazyflie-firmware/cf2.bin. Use--stm32Fwto specify a custom path.- flash (NRF)
Flashes NRF51 firmware to enabled CFs. Only works if
crazyflie_serveris not running at the same time. Assumes that firmware is built incrazyflie2-nrf-firmware/cf2_nrf.bin. Use--nrf51Fwto specify a custom path.
Testing configuration
Once you have finished configuration, move on to the Hovering (hello, world) tutorial for your first test flight!